
When I think back on my 8 years of professional web development experience and the last decade of programming for the web, I can hardly think of a single project which did not include at least a few API calls to receive some additional information. With the rise in popularity of microservice architectures during the last years, it even gets more obvious that we need tools to properly navigate through APIs and have an easy way to test them quickly. There are various solutions on the market, and you might already have heard or used Postman before! But I’ve seen many developers only using a small percentage of all the features that the tool is offering. That’s why I want to give an introduction to Postman by guiding you from your first request to a fully-fledged, collaborative test suite that can be automatically run in Gitlab CI.
Grab a coffee – enjoy some Bone Thugs N Harmony with me – and then let’s talk about: Postman!
Getting started
How to install
Before we can start and try all the examples below, you need first to install the Postman client. Quickly visit https://www.postman.com/, register (if needed), and install the latest version of Postman. Don’t worry, it’s free of charge, and I don’t think I’ve ever received any annoying advertisement from the Postman team!
Your first request
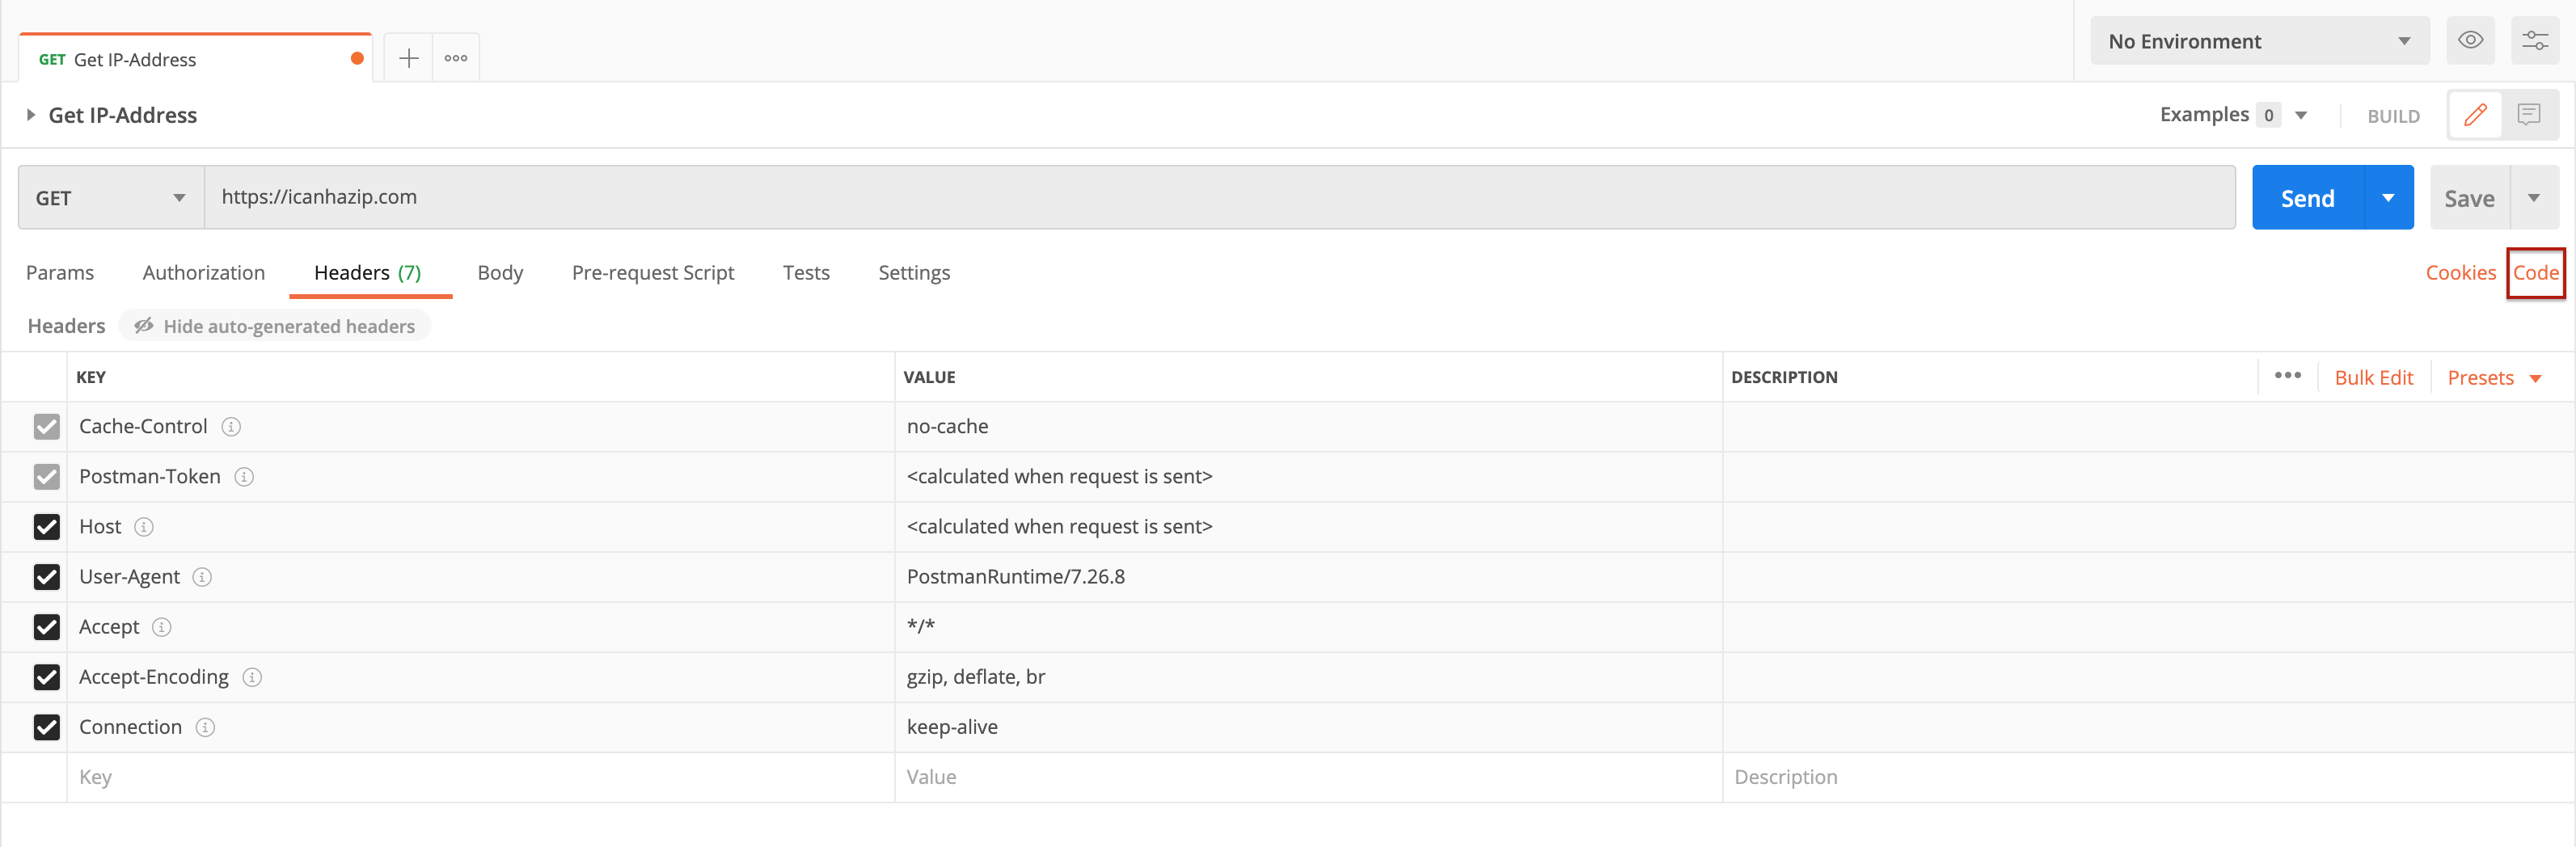
Let’s get started with our first request. After you’ve successfully installed Postman, you might see the start screen asking you what to do. If not, click on the “New” button in the upper-left corner and then click “New Request”. Both the name and description are completely up to you. I chose to create a new Collection called “Postman article”. Collections are a nice way to organize all your requests for a specific project. You can even use subfolders here and do some cool stuff I will tell you later!
Our first request will get us our current IP address by requesting a GET request to https://icanhazip.com/. So simply add the URL and send the request. You will find your IP address in the response body at the bottom. Take a moment to browse around the different tabs to see what you can configure for your requests and how to see all relevant information of the returning response. There’s really great documentation online at https://learning.postman.com/docs/getting-started/navigating-postman/.
Generating Code snippets
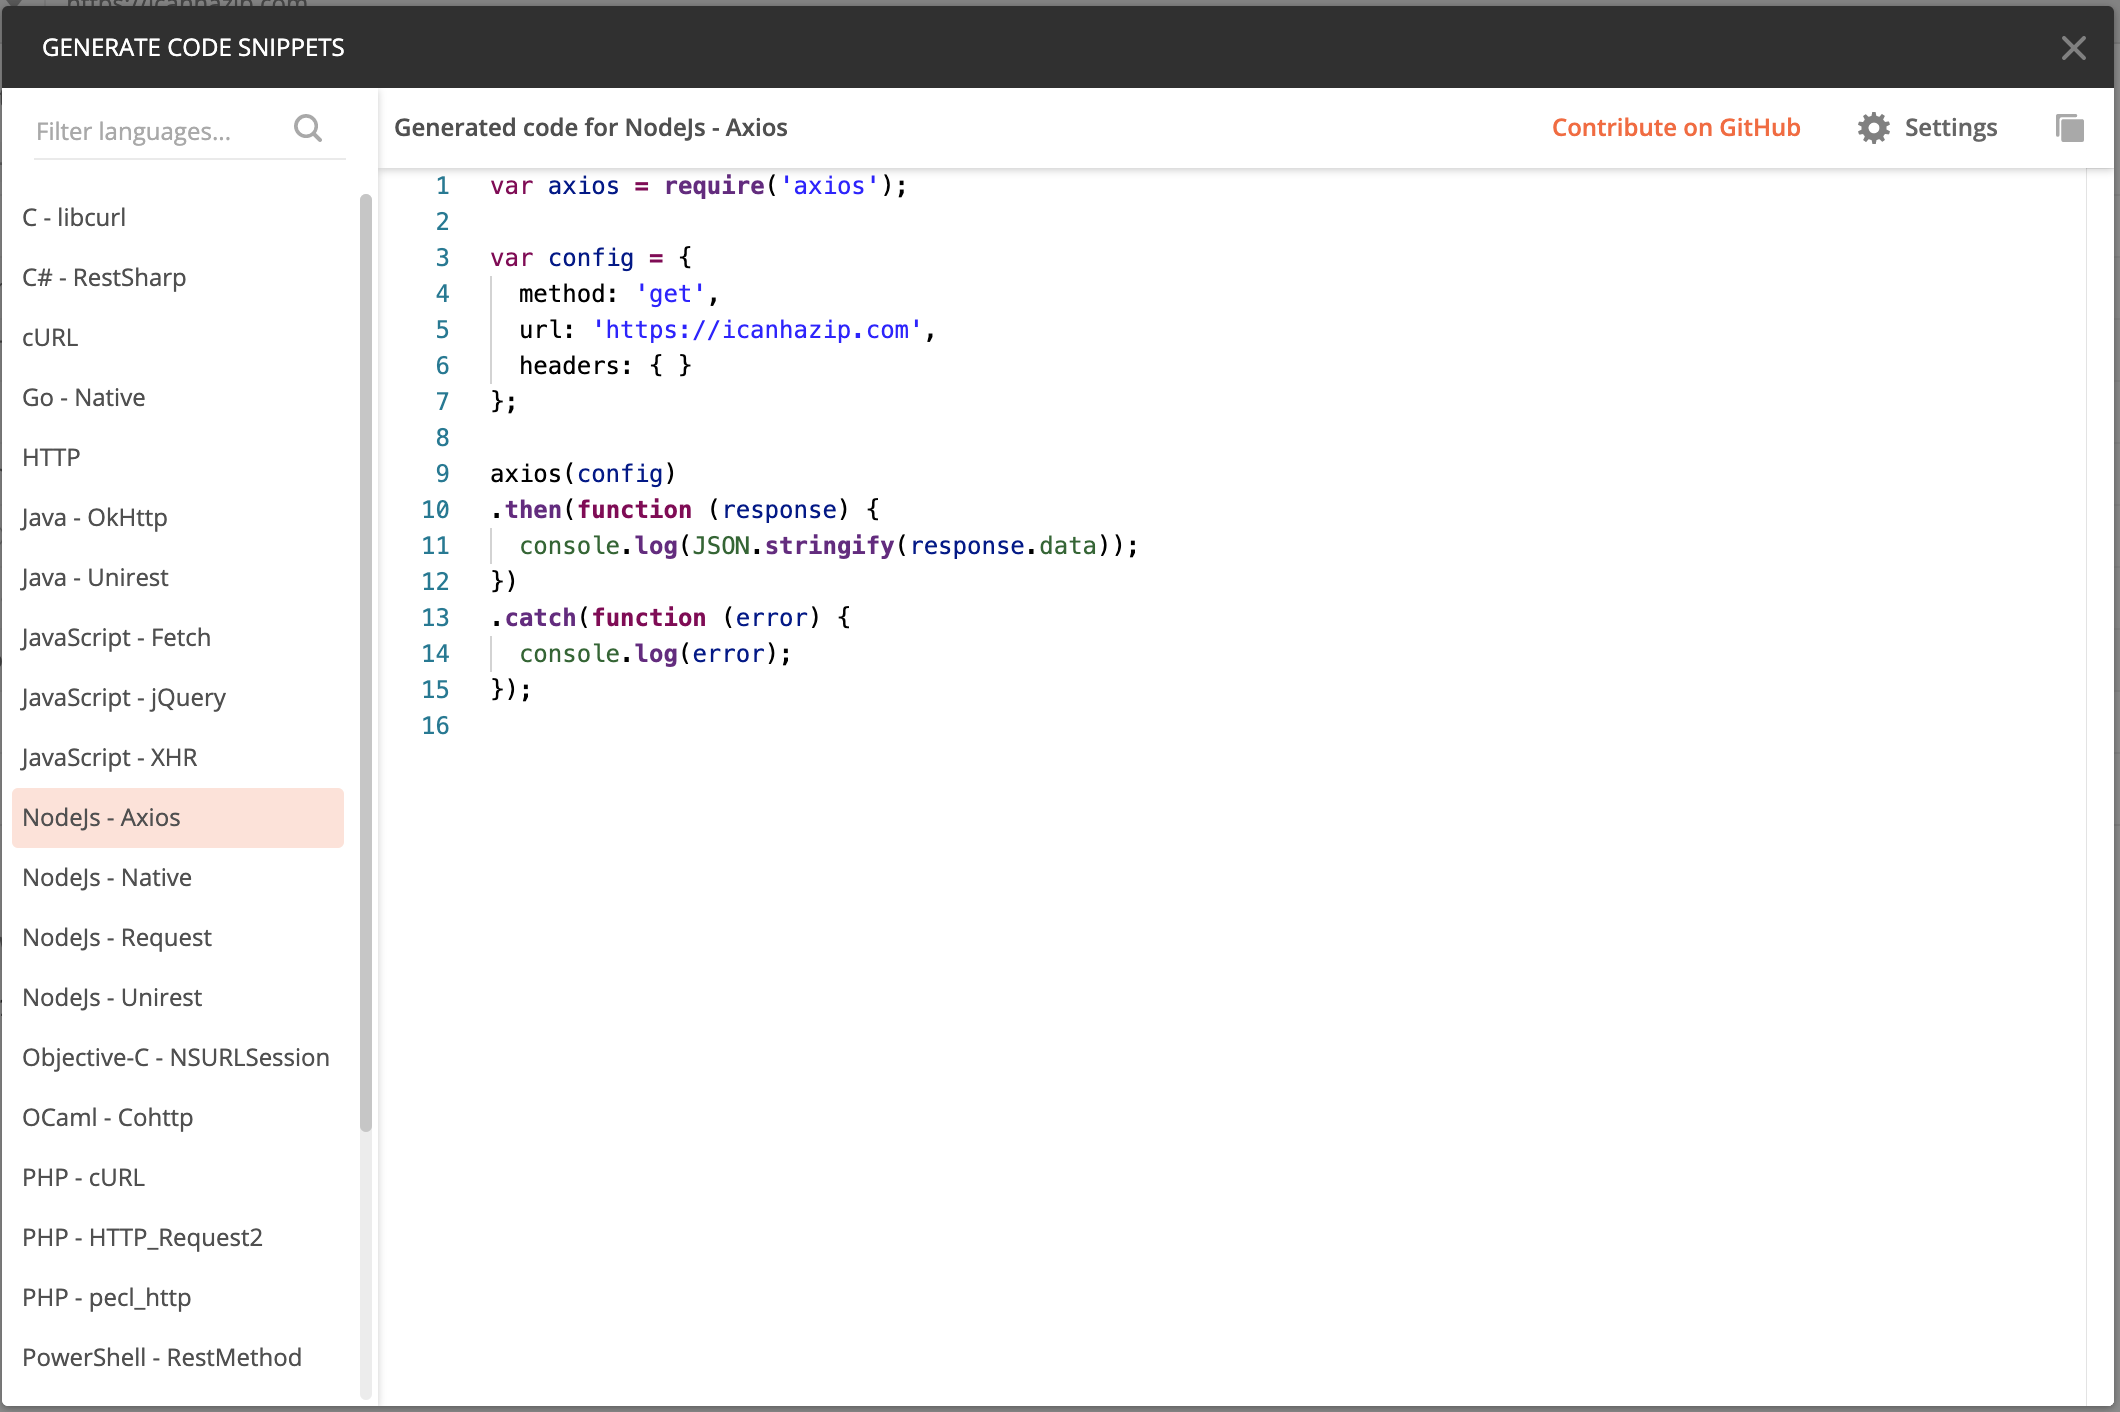
One of the great and slightly hidden features of Postman is the functionality to generate code snippets of your requests. You can generate snippets for different languages (Java, PHP, Python, Go, C#, Ruby, etc.), different libraries (mostly NodeJS & Python), but also for your CLI with cURL, wget or for your PowerShell! This might now be a game-changer when requesting a simple GET request, but it comes in very handy when you have a more complex request with multiple needed headers, authorization, and payload!
You will find the functionality hidden behind this small link called “Code” in the upper right corner:
Variables and Environments
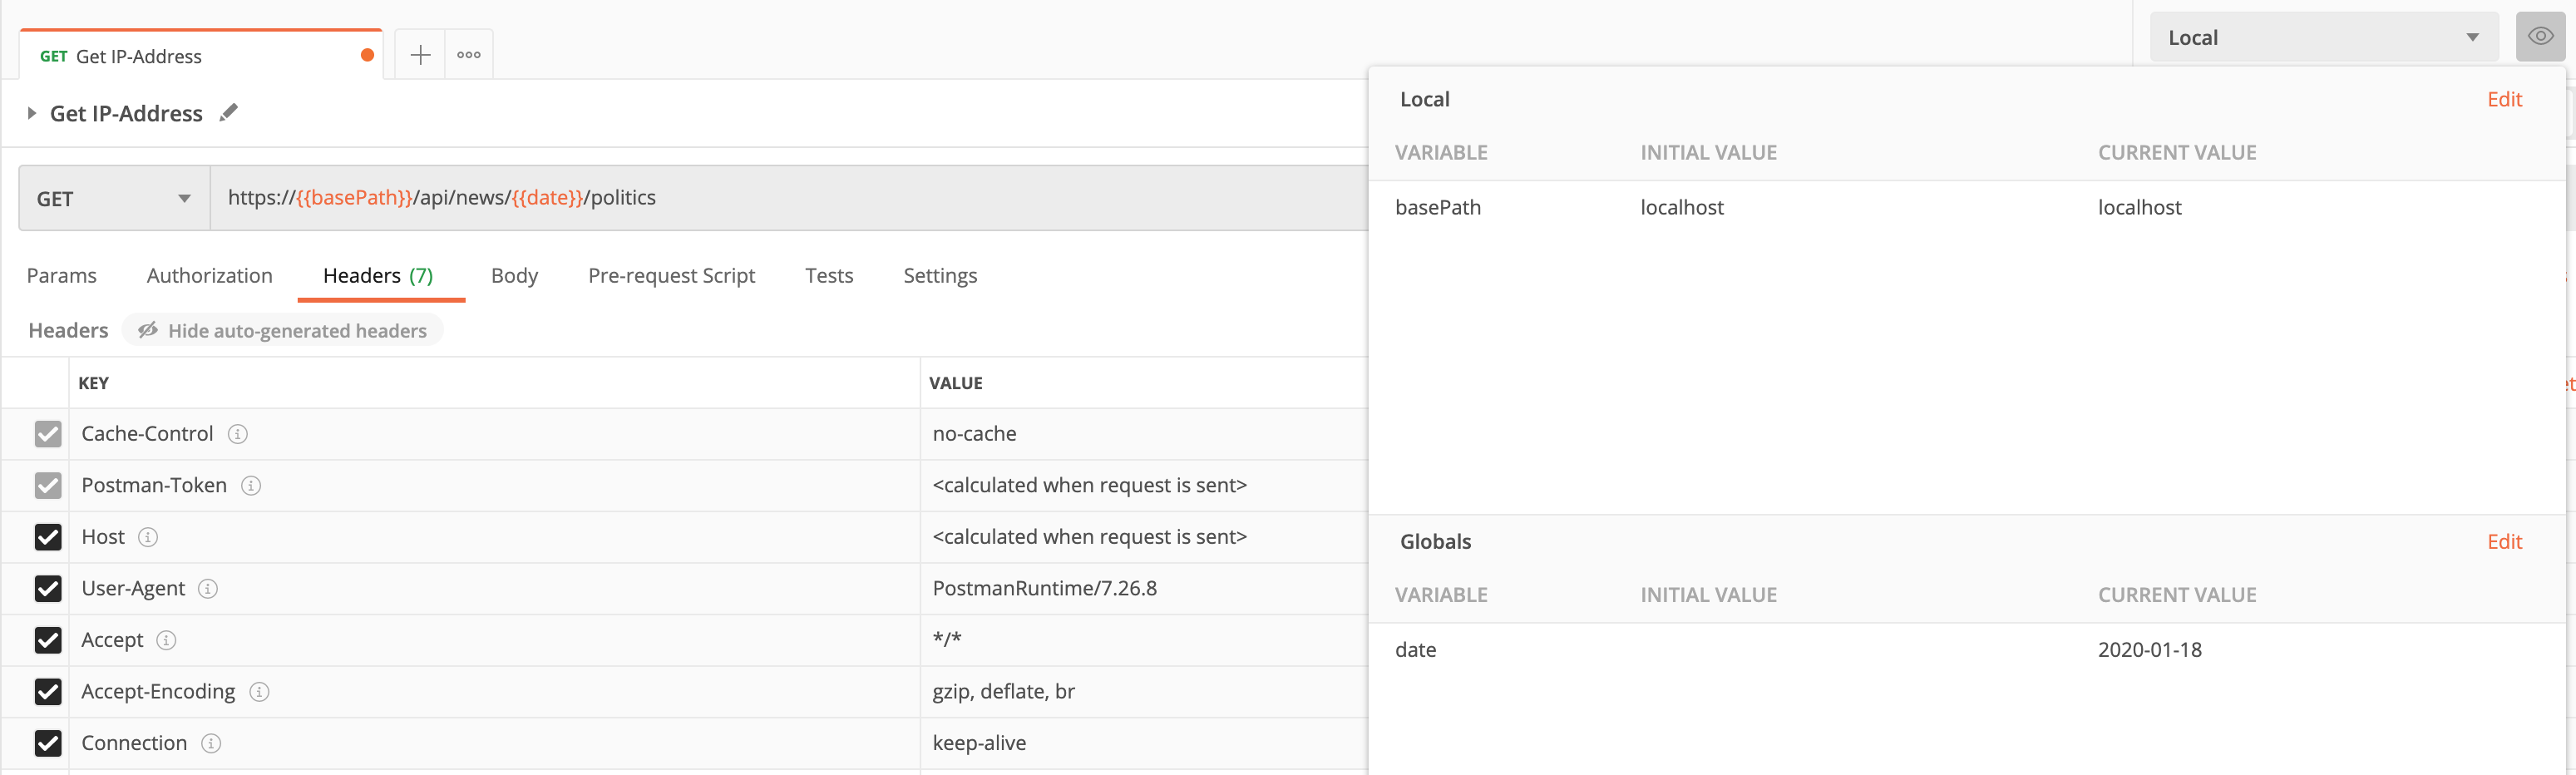
When using Postman for browsing through your API, you might run into the situation that certain parts of your requests are dynamic. For example, you have a request which shows you the news for a specific date and has subrequests for multiple categories (e.g., politics, sports, economy):
https://your-api.com/api/news/2020-01-18/
https://your-api.com/api/news/2020-01-18/politics
https://your-api.com/api/news/2020-01-18/sports
https://your-api.com/api/news/2020-01-18/economy
Now you have 4 requests saved inside your Postman collection, but you want to test them all for another date. One way could be to go through all requests and change the date, of course. The other way is to use variables in your URL path!

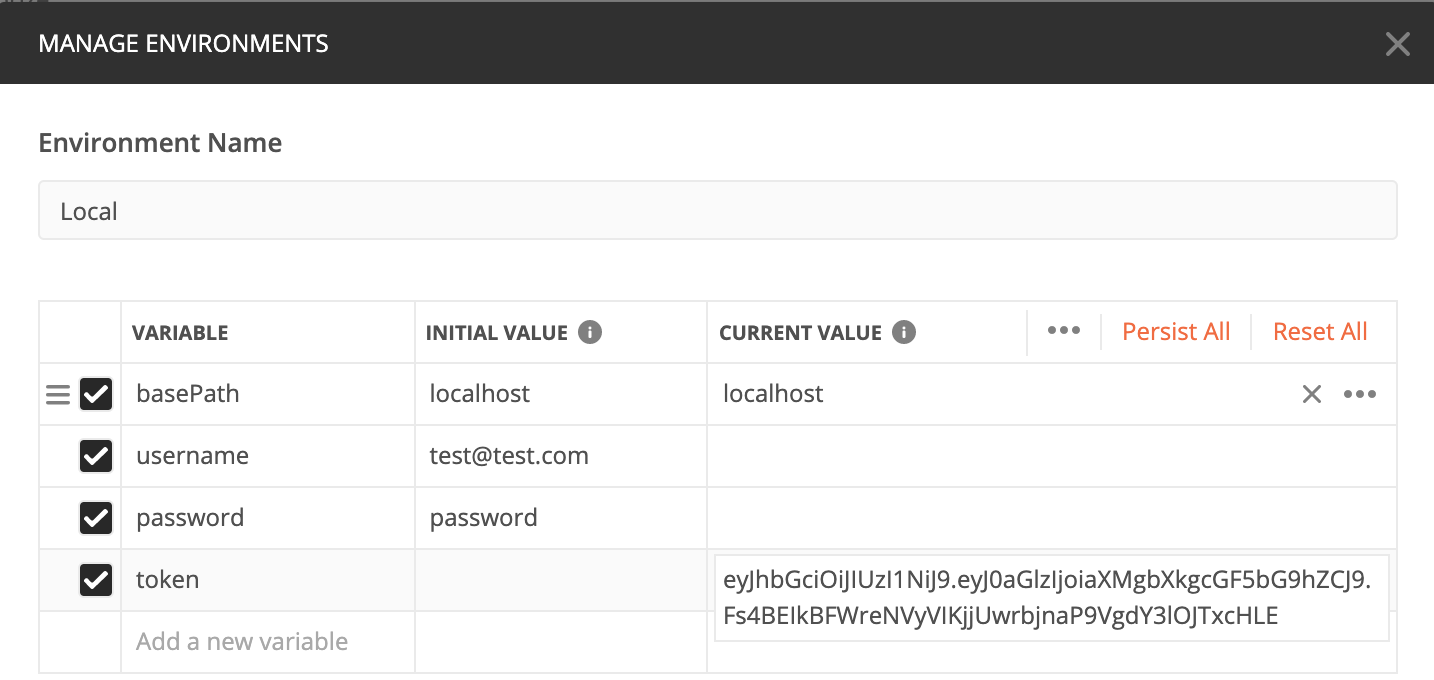
You can either add the variable as a global variable (which means they can be used across multiple environments and collections) or create a new environment. Environments are an awesome way to distinguish between the different stages of your application. Say you have a local, staging, and production environment: The same way you would use .env files, you can define variables for each environment and then choose which environment to run it on!
For example, you could use one collection for your project and change the host path of your application depending on the environment you want to send your requests to.
There’s a lot more in-depth knowledge about Variables and Environments in the official documentation!
OAuth2 Login with Postman
Let’s have a look at a more complex example! So far, we’ve learned how to use variables and define environments. Now we want to take it to the next level! Let’s say we have a typical OAuth2 form login with an email address and password as a JSON payload. We will send our credentials to the /authorize endpoint and receive a Bearer token, which can then be used to access all access-protected/user-specific endpoints.
The /authorize request will be fairly easy! We set the method to POST, configure the URL, and need to add the body as follows:
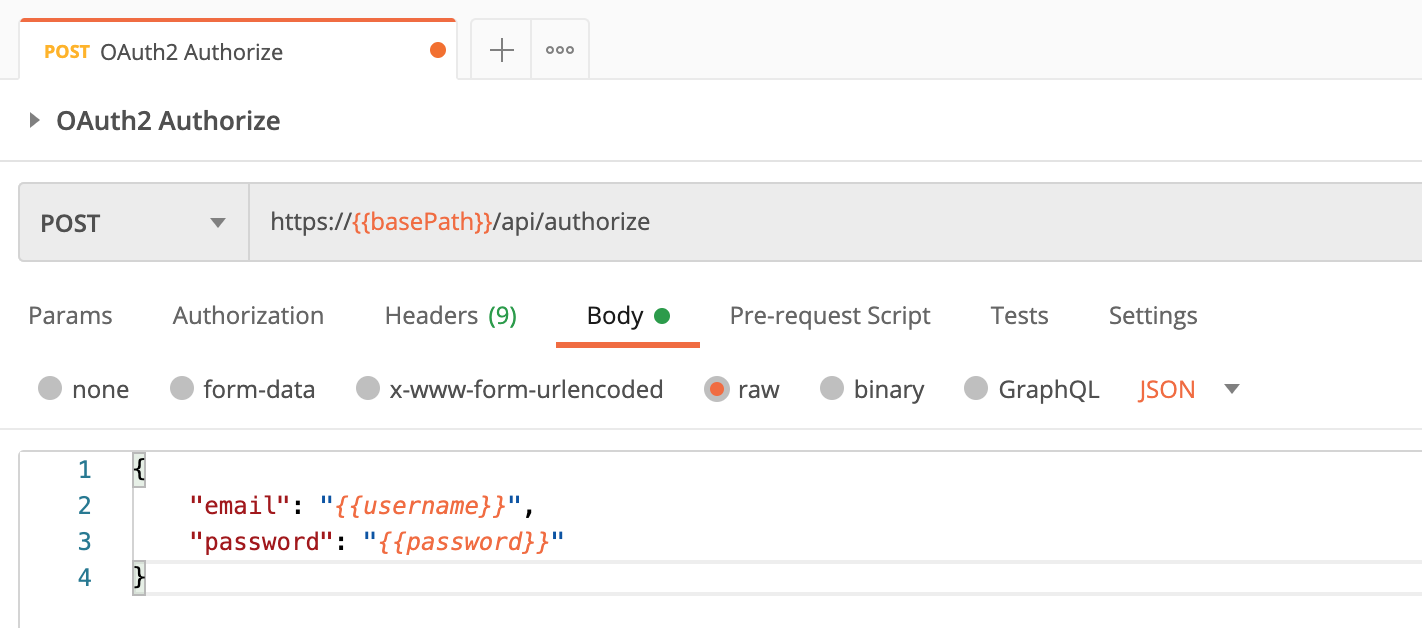
Note that I’ve used variables here again. Depending on your environment, you might be testing with different user accounts! For this reason, I would recommend you to create two environment variables for it. When you send your request, you might get a response similar to this:
{
    "id": 123,
    "enabled": true,
    "auth_token": {
        "token_type": "bearer",
        "access_token": "eyJhbGciOiJIUzI1NiJ9.eyJ0aGlzIjoiaXMgbXkgcGF5bG9hZCJ9.Fs4BEIkBFWreNVyVIKjjUwrbjnaP9VgdY3lOJTxcHLE",
        "expires_in": 3600,
        "refresh_token": "28665e0e31abd9f66a10ed801a29de785..."
    }
}
Great! Login was successful. Now, we can use the access token and save it as the current value of our environment variable token. Why would we save it in a variable? Well, now we can request all access-protected API endpoints and don’t need to think about setting the token anymore:
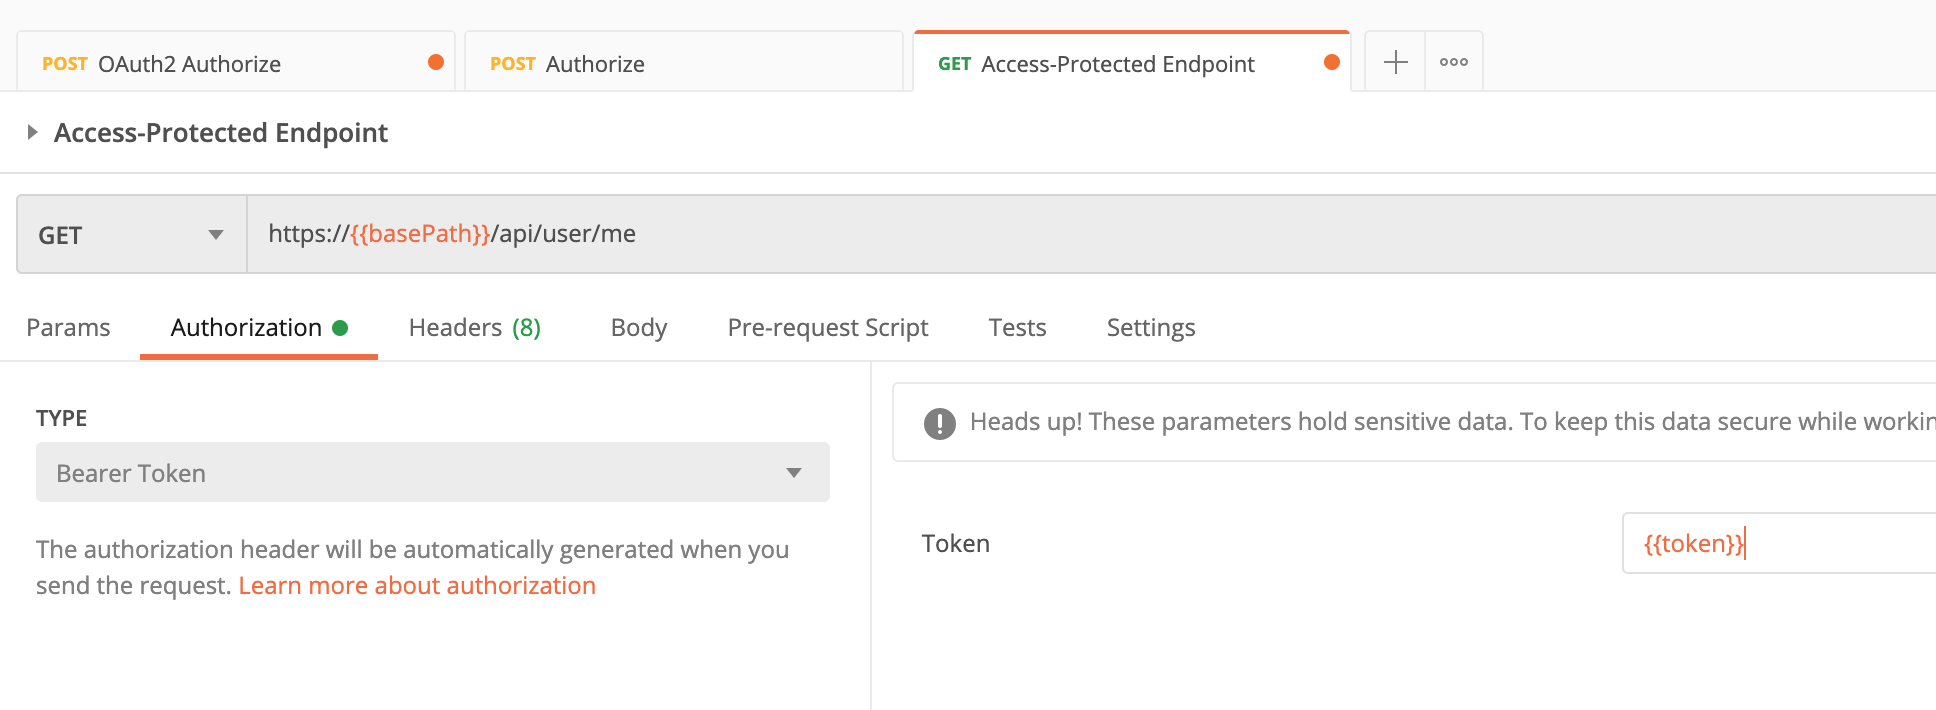
But wait! Let’s use the full potential of Postman and make saving the Bearer token automatic! To do so, we need to go into the “Tests” tab of the /authorize request and add the following Javascript code:
const json = pm.response.json();
pm.environment.set("token", json.auth_token.access_token);
The pm Postman object contains many attributes and helper methods to write JS tests that are run automatically after executing a request. To find out more about scripting in Postman, I can once again recommend you to visit their documentation about Scripting.
Tests
With only two lines of Javascript code, we were able to automate the API authorization. After executing the /authorize request, the script is automatically executed, and we can access all user-specific API endpoints. Additionally, the automatic execution of Javascript scripts after each request can be used for a lot more: we can write tests!

You want to do smoke tests and check if your pages are responding? Do it! You want to test your page’s performance by testing the maximum response time? Do it!
You want to test the content of your API’s response to see if all keys are there? Do it!
I am going to show you all three things by example. But there is a lot more you can do, so be creative and try it out on your own!
Smoke testing the response status
Every test is a callback inside a pm.test() call. Give the test a proper name you so understand later on which of your tests might have failed:
pm.test("Should return status 200", () => {
    pm.response.to.be.status(200);
});
Maximum response time
As you’ve seen above, there are certain constraints you can use directly for testing (like pm.response.to.be or pm.response.to.have), but for specific attributes, you need to use the pm.expect(...) syntax.
pm.test("Response time is less than 2000ms", () => {
    pm.expect(pm.response.responseTime).to.be.below(2000);
});
Testing keys inside the API response
But pm.expect(...) does not only accept attribute from your response but can contain any kind of value (e.g., integers, strings, arrays, etc.):
const json = pm.response.json();
pm.test("Test page title", () => {
    pm.expect(json.title).to.contain('Start')
});

pm.test("Test page id", () => {
    pm.expect([1, 2, 3, 4]).to.contain(json.id)
});
Note: As of the current version of Postman, pm.expect will only be evaluated as a test when you surround it with a pm.test() call.
Test Suites
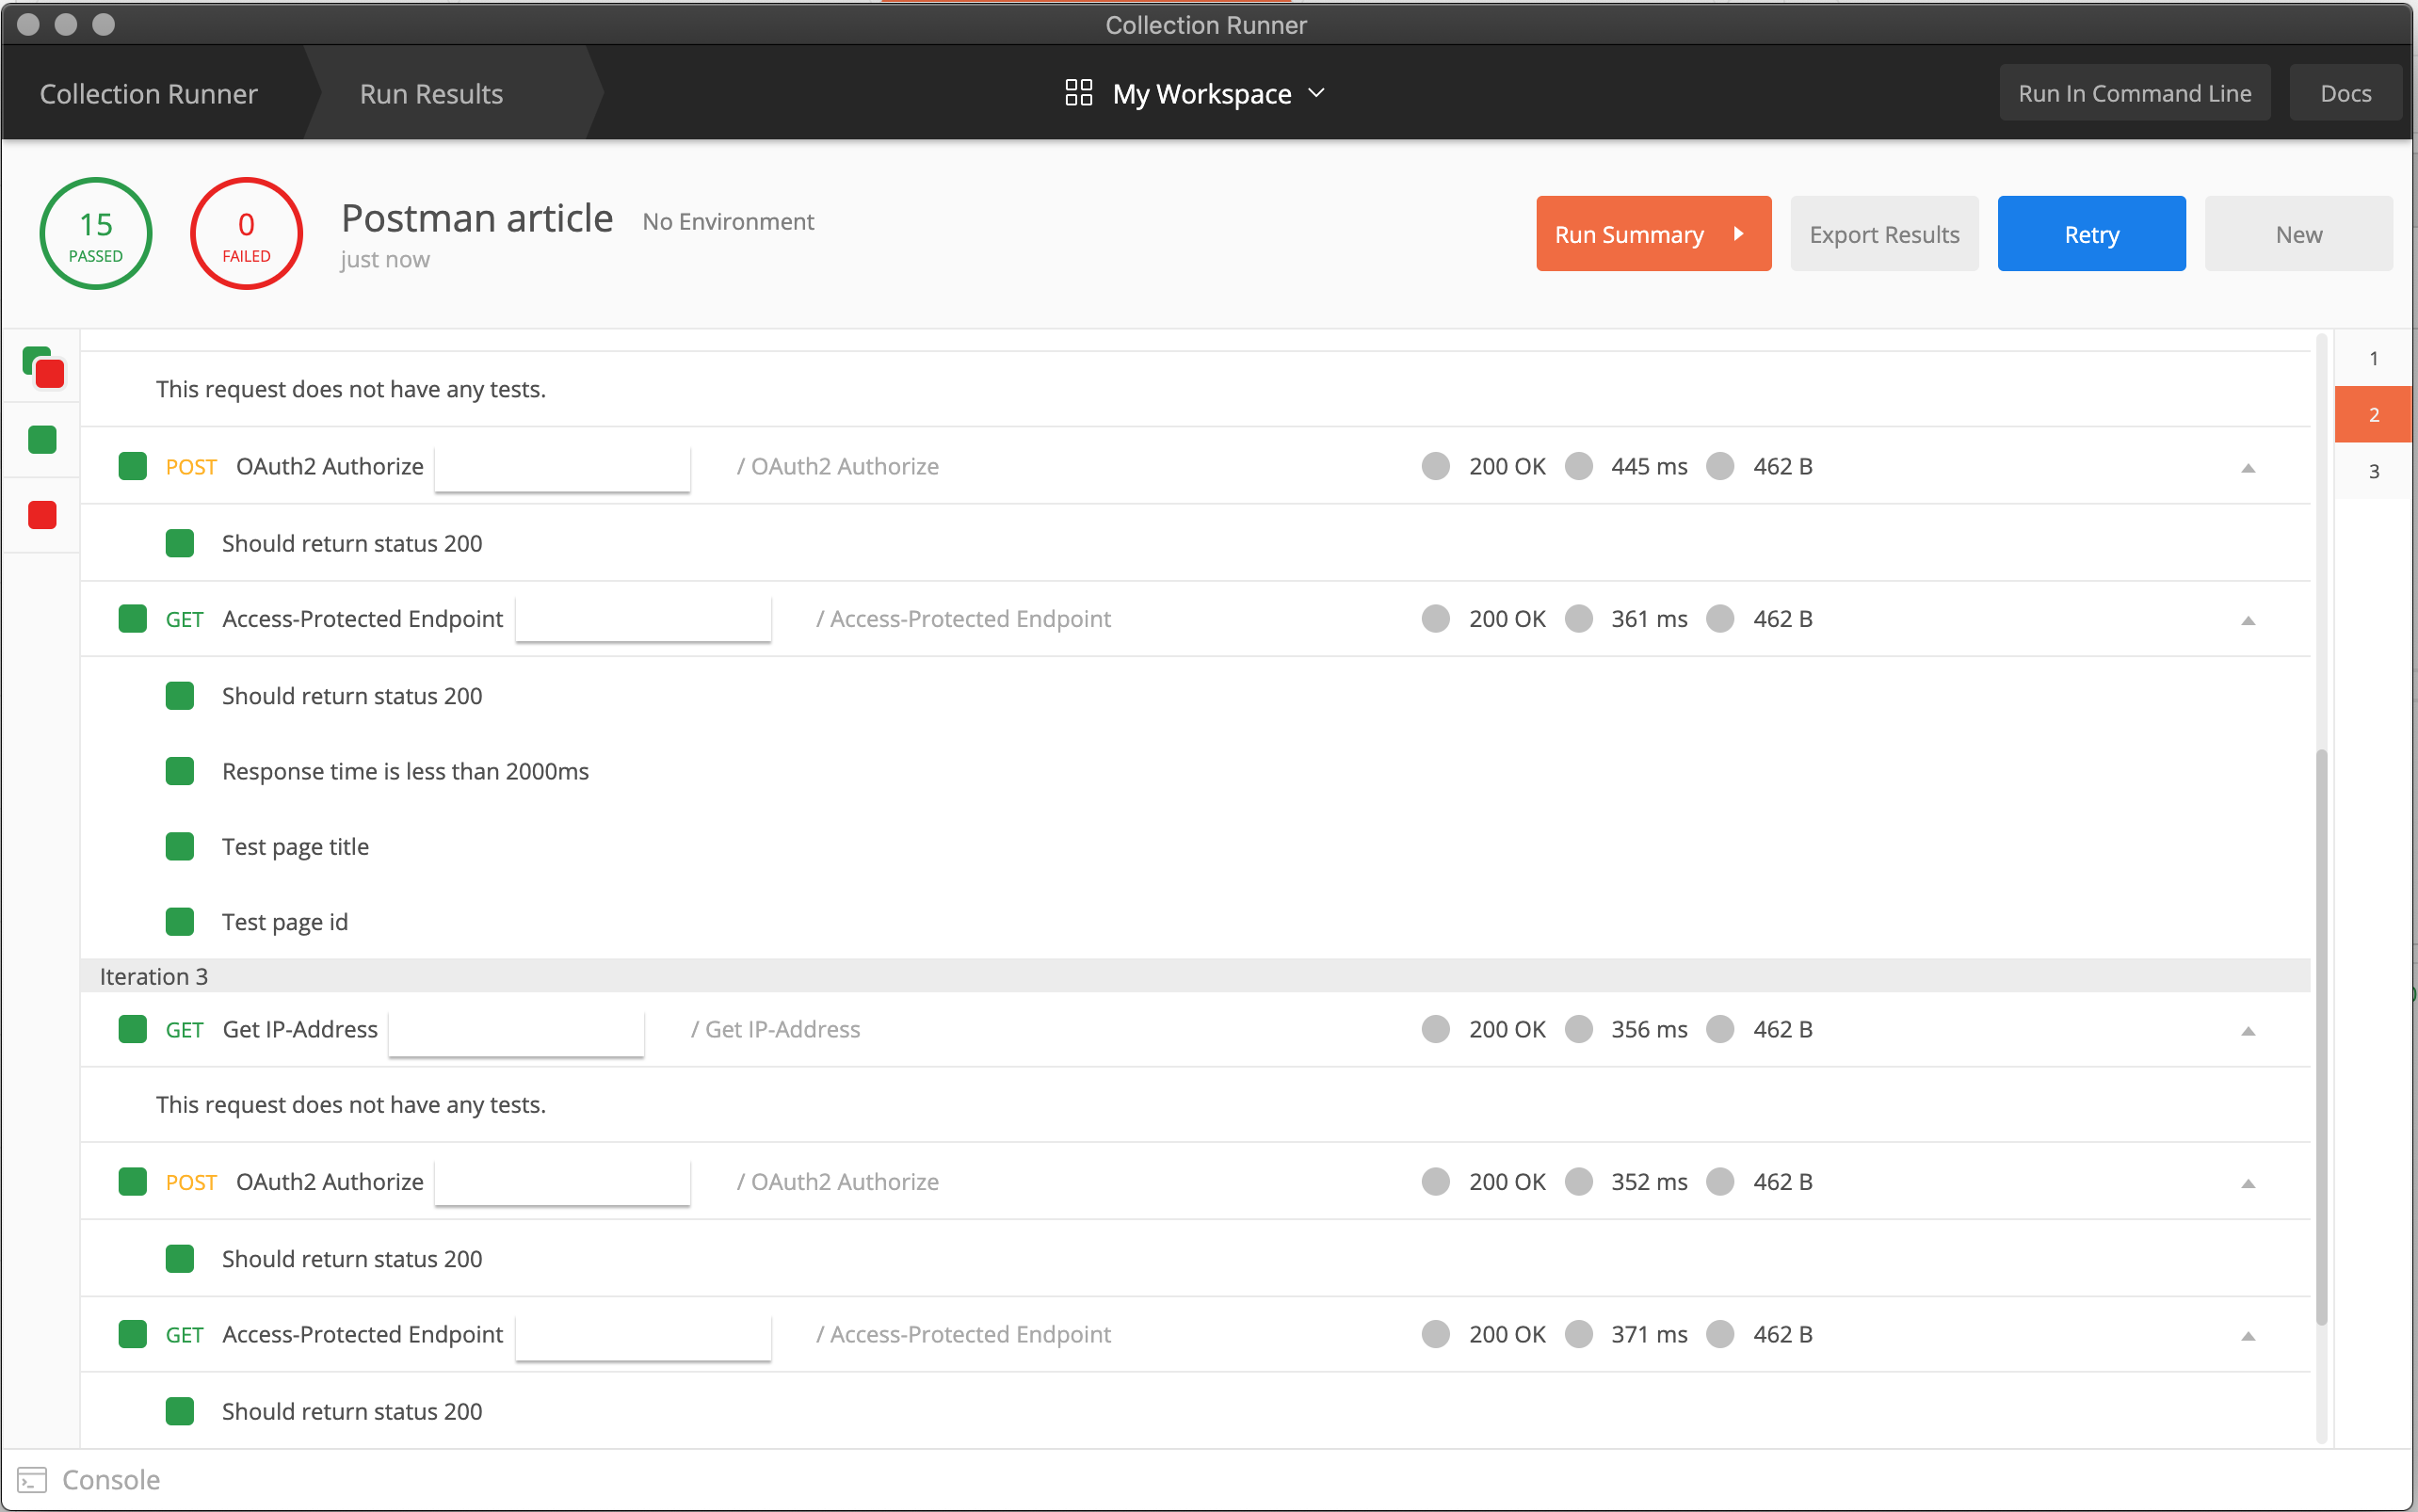
With these features, I bet you can think of many cool ways to implement automatic tests for your API, which can be written by anyone with a little knowledge of programming / Javascript. However, these tests’ full dimension only shows its effect after you run them all together as a Test Suite! Either click on “Runner” in the top left corner or click on the arrow next to your collection to open the “Collection Runner” window:
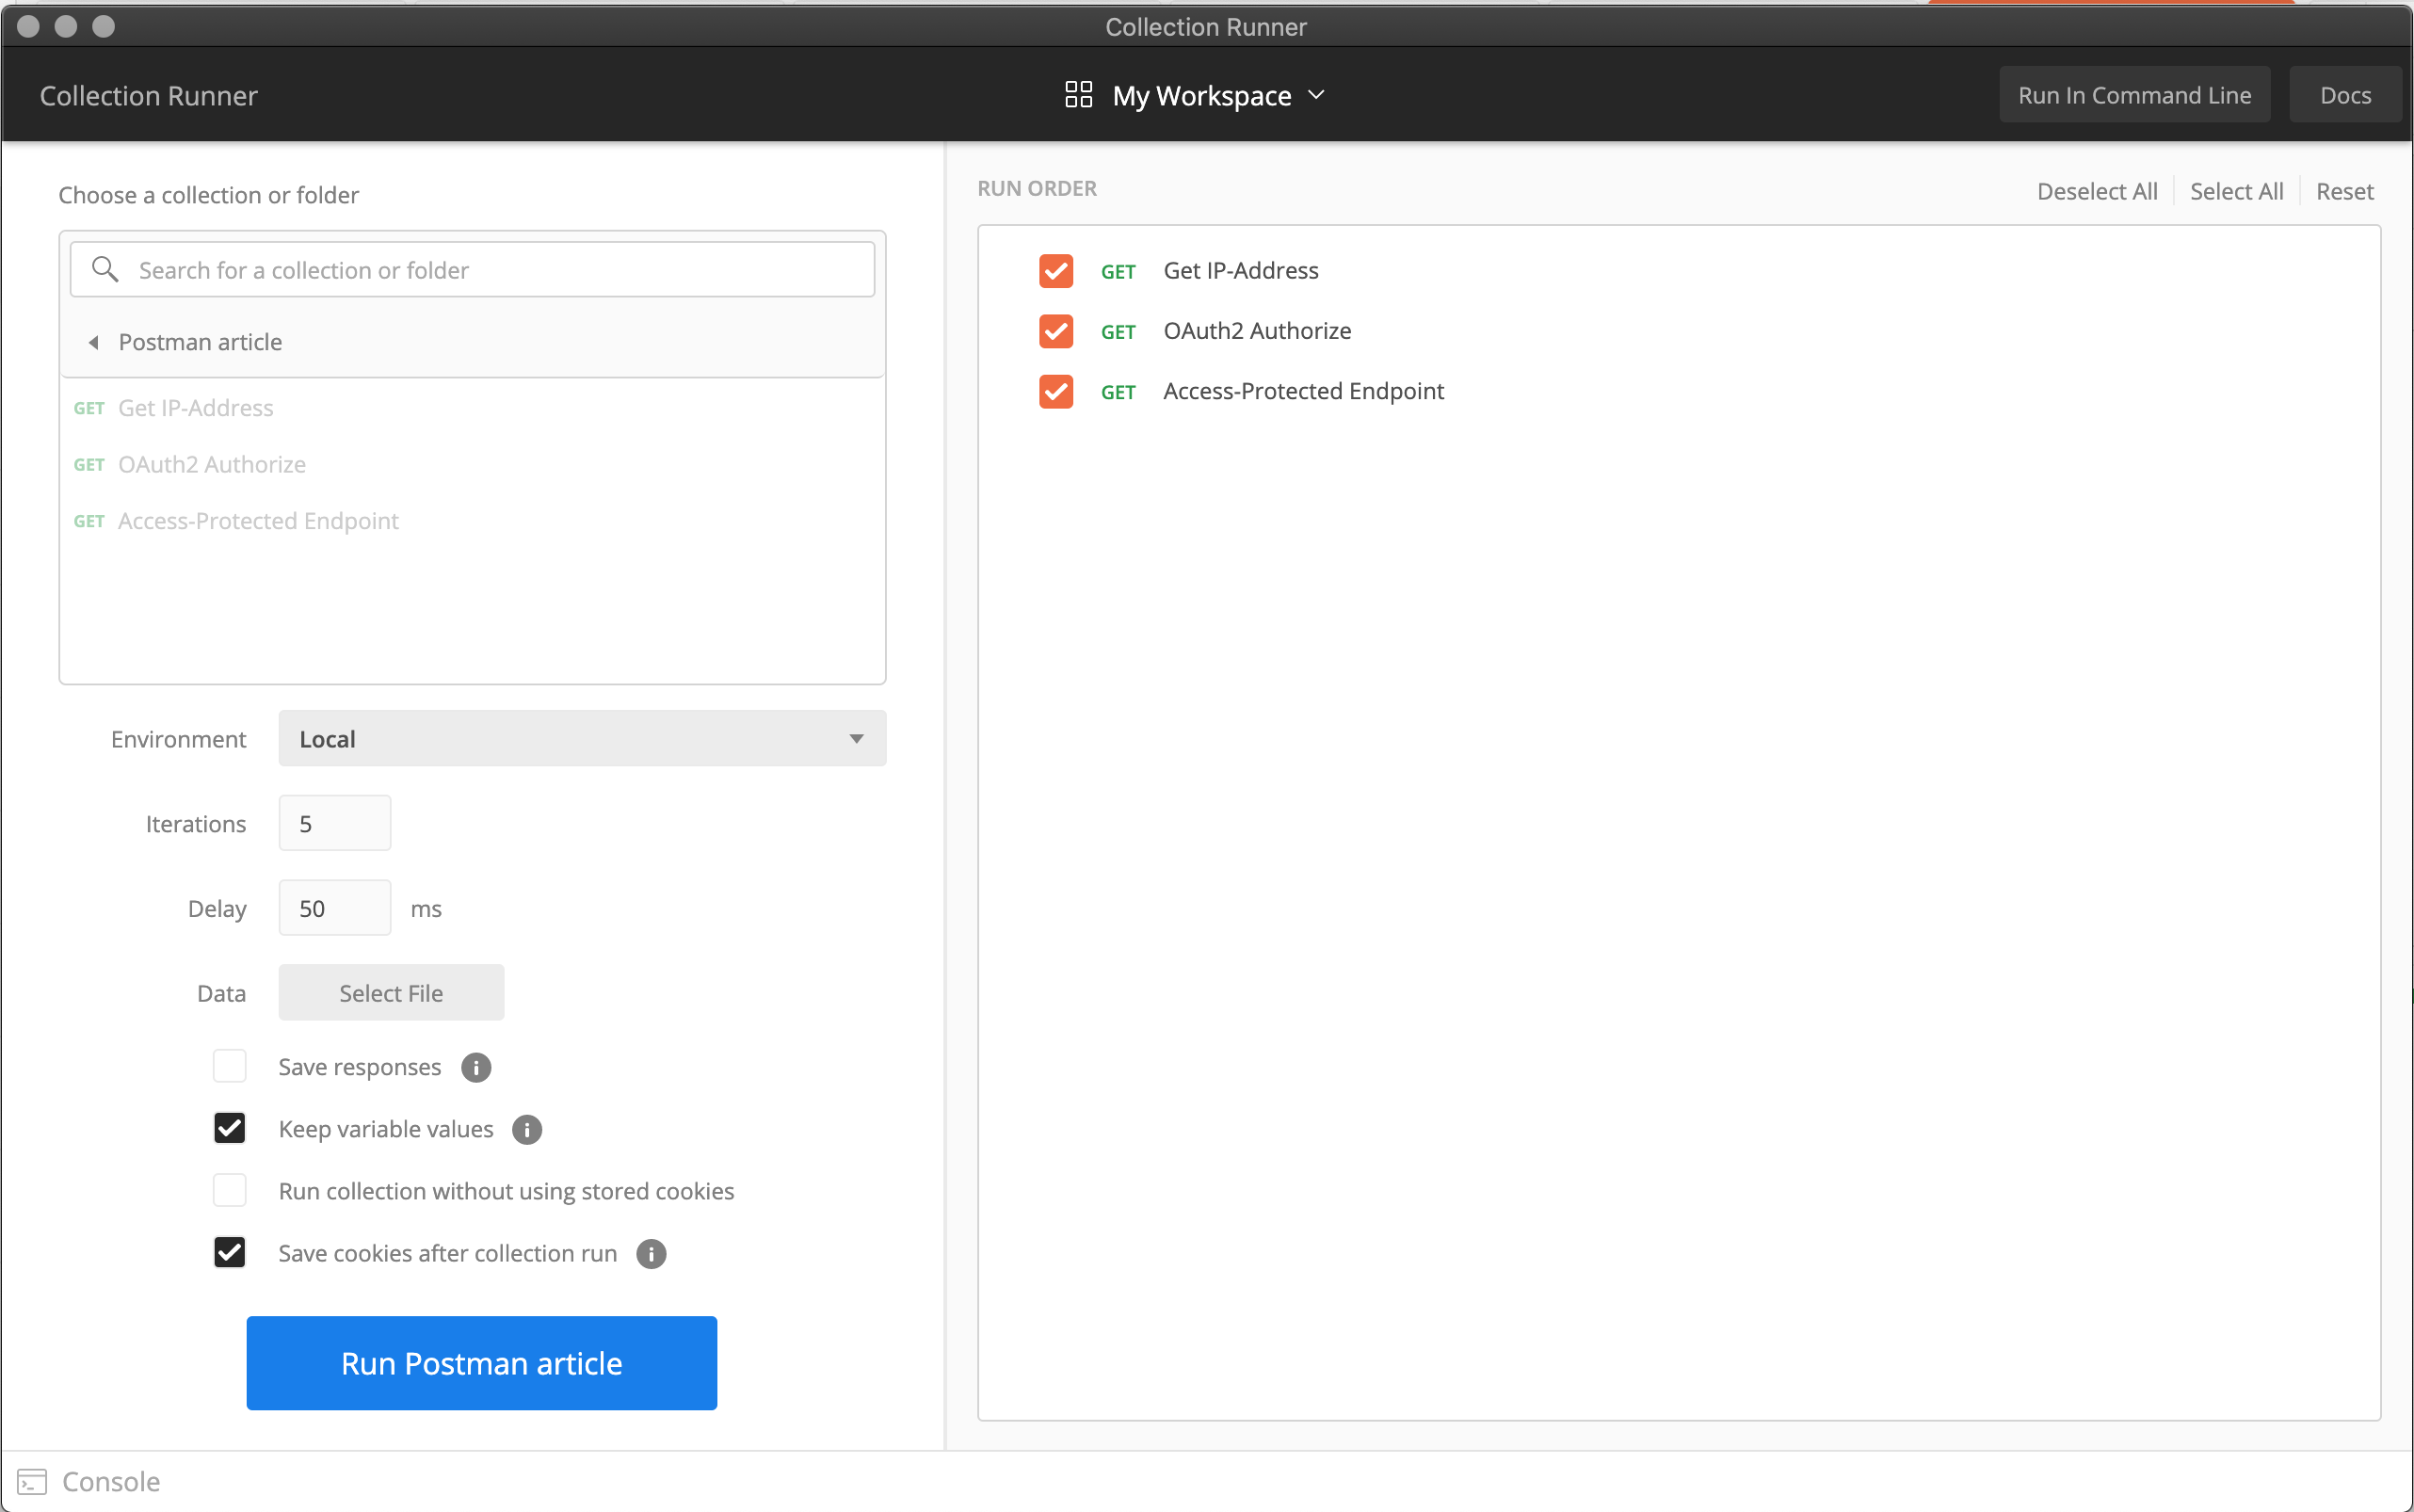
You can run them multiple times in succession, take a X ms pause between each request and configure the Environment you want to use for your tests. In the end, you hopefully have only a few unsuccessful test. You can filter those with the buttons on the left side of the runner.
Note: Save your requests! Unsaved scripts won’t be taken into account, you have to actively save them!
Sharing your Collections
Imagine you’ve created the most awesome Postman Collection for your project. Now what? How can your team profit from your work? How can others distribute to the time you’ve already invested in the collection? Are you the only person who’s able to adjust API calls to new requirements or add tests to the suite? Certainly not!
There are multiple ways you can share a collection with your team members. Click on the 3 dots next to your collection and then choose “Share Collection”. Now you can either share them with a workspace (which is the best solution for working on it with your team, I guess), create an Embed button (suitable to embed a “Run with Postman” button inside your repository, ticket system, or similar things), or you can create a public link (which is most suitable if you want to share the collection with external partners for example). For more detailed instructions, have a look at the Postman Documentation.
Lastly, you could also save your collection by choosing the “Export” option. There, you can choose between different versions of the Postman JSON format so that others can import the collection again. Furthermore, for sharing your collection between several clients, you can create an account that will sync your collection between all logged-in Postman clients!
Continuous Integration
After looking at all these amazing features, there is still one open question: Can we fully automate our collection to run after every deployment to our staging/production servers?

First, let’s start by trying it out locally! We need to install the Newman CLI via npm first:
$ npm install newman
As for the whole Postman software, there is great documentation for the Newman CLI, too! After we’ve installed newman, we can run either a local (i.e., exported) collection or run a collection via a shared (public) link:
$ newman run your/collection.json

// OR

$ newman run <https://www.getpostman.com/collections/631643-f695cab7-6878-eb55-7943-ad88e1ccfd65-JsLv>
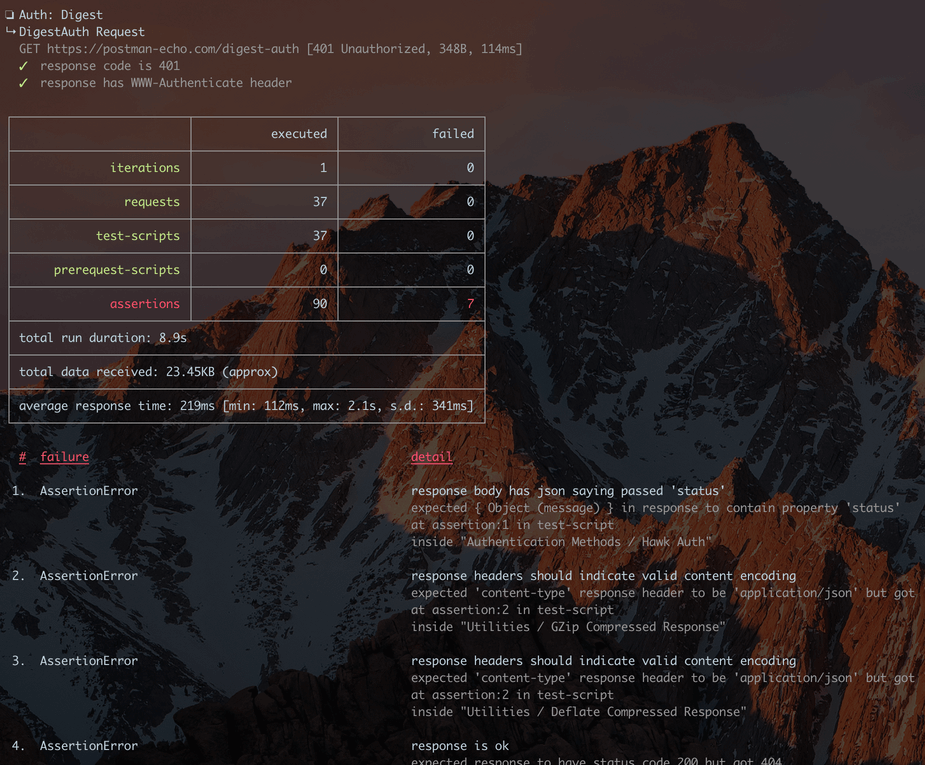
You can try and run the public link (“Postman Echo” from the Newman documentation) to see the clear and nicely formatted console output, including a summary table and a list of failed tests in the end:
Now, it’s just a tiny step to add it to our Gitlab CI pipeline! We just need to add a new job in the post-deploy stage of our pipeline by adding it to the gitlab-ci.yml:
stages:
	- build
  - deploy
  - post-deploy

# ...

newman-tests:
  stage: post-deploy
  image: node:latest
  before_script:
    - npm install -g newman
  script:
    - newman run $NEWMAN_SUITE -e $NEWMAN_ENVIRONMENT
I’ve decided to put the source of the suite and the environment filename into CI variables. This way, you can reuse the job in different scenarios or change the configuration in Gitlab without the need to adjust the configuration file itself! You can export environments by clicking on “Manage environments” inside Postman and then export your desired environment(s).

AND IT’S ALL FREE!
The most amazing part after looking at all these features remains that you can use all of this free of charge. Postman has a few different pricing plans, but if you don’t need the API mock and design features, you can get a very long way with the free version. And if you’re at the point that you might need to get a paid account, you already used quite a lot of the functionality, and it will probably be worth its price!
So I hope you enjoyed today’s post and learned something new. What tools are you using for navigating and testing APIs? Let’s keep in touch. Don’t be a stranger! 😉